The “Audio services not responding” is a common error message in Windows 10. When the system displays this error in the Windows sound troubleshooter, it means the sound device has become unresponsive.
There can be many reasons behind audio services not responding. The sound settings may be disabled, the audio driver may malfunction or the recent windows 10 update messed up with the driver.
Here we will discuss what you need to do when audio services not responding.

Solution 1: Restart Audio Services
Try fixing the audio service error with the basic solution by restarting the audio services. Here’s how you can do it.
1. Press Windows+R together, type services.msc in the box and hit enter.

2. From Services, right-click on Windows Audio and select Restart.

3. Again right-click on the same option and choose Properties.

4. Navigate to the Startup type option and set it as Automatic then click Apply to save the changes.

5. Open the Services again and right-click on Windows Audio Endpoint Builder to select Restart. Click on Start if the restart doesn’t begin.

6. Once the process begins, go to Properties to set the startup type as Automatic.
7. Finally, click Apply to save the changes and exit.


8. Now, restart your computer and check if the problem has been solved.
Solution 2: Check Audio Components
You can check all your audio components before you try any technical procedure to solve the issue. Even disabling the antivirus temporarily can solve your purpose in some cases as that antivirus often block some services.
Follow the steps to check audio components.
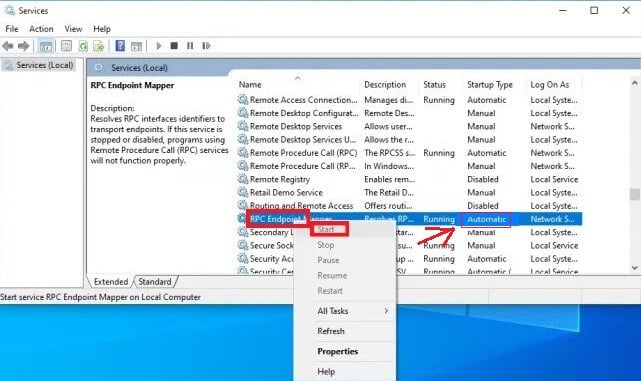
1. Type services.msc in the search box and press Enter.
2. Look for RPC Endpoint Mapper, Remote Procedure Call (RPC) and DCOM Server Process Launcher services. If any of these are not running, right-click on them and select Start.
3. After restarting these services, set their Startup type as Automatic.


4. Finally, restart your pc and check whether the problem got solved or not.
Solution 3: Execute Command Prompt Instructions
Try executing some command Prompt instructions in case solution 1 or 2 doesn’t work for you. Here’s what you need to do:
1. Type cmd in the search box and and run Command Prompt as an administrator.

2. In the Command Prompt window type net localgroup Administrators /add networkservice and hit Enter.

3. Next type net localgroup Administrators /add localservice and press Enter.

4. After executing both the commands, type exit and press Enter.
5. Restart your computer to check for yourself if the problems have been solved or not.
Solution 4: Install Default Sound Drivers
To install a default sound drivers, follow these steps:
1. Search for System settings and click on Advanced system settings.

2. Open the Hardware tab and click on Device Installation Settings.

3. Select No (your device might not work as expected)
4. Click Save changes and exit the window. Now, the audio drives won’t be updated automatically.

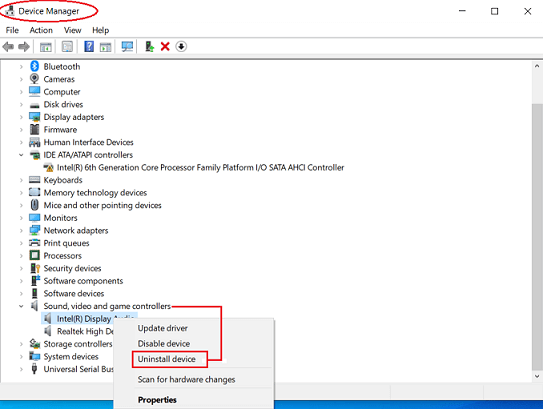
5. Again type device manager in the search box and open it.
6. Expand Sound, video and game controllers then right-click on your sound device and choose Uninstall Device.

7. Make sure to check the uninstall driver checkbox and continue the uninstall process.
8. Once the uninstallation is complete, click the Action tab above and select Scan for hardware changes. Windows will automatically detect your audio hardware and will install the default drivers accordingly.

9. Check whether your problem is solved. If not, try restarting your PC and check again.
Solution 5: Install Realtek or High Definition Audio Device
Instead of installing IDT high definition audio CODED, the problem can be solved by installing Realtek or High definition. Here’s how to install the high definition audio driver:
1. First, press Windows+X and go to Device Manager.

2. After opening Device Manager, click on the Sound, Video and Game Controllers option.

3. Now, right-click on the sound driver and select Update driver. Ignore if you find any option asking whether you want to install the drivers automatically or manually.

4. Click on Browse my computer for driver software > Let me pick from a list of device drivers on my computer.


5. Uncheck the Show compatible hardware option. Scroll through the list and click on the High Definition Audio Device option and click Next.

6. Install the software and restart your computer. Check if the problem is solved.
Solution 6: Restore from the last Restore Point
If none of the above-mentioned methods work for you, the only option left is restoring Windows to the last restore point. In case you don’t have any restore point then, try installing a clean version of Windows.
Let’s get into the process:
1. Press Windows+S and type restore. Next, click on the first option that shows up.
2. Once the restore settings open, click on System Restore.

3. A wizard will open, press Next to follow the instructions provided and continue the restoring process.

4. Next, select the restore point.
5. A confirmation notification will apear before windows start the system restore process. It is recommended to take a backup of your important files before starting the process.
6. Once the restoration process is finished, check if the problem has been fixed.
That’s all. Hopefully, these solutions can easily fix when the audio services not responding on Windows 10. Give them a try. If you’ve any more tips, share them with us in the comment box.